


Are you on your host computer? #
Your host computer is the PC where QuickBooks is currently installed and where you currently have the company file stored. It’s the PC with the programs on it that you want to access remotely. That’s the PC you need to be on to set up QuickBooks so it can be accessed remotely.
You can follow the steps below or if you prefer, you can watch the steps in the video at the bottom of the page.
Step 1 – Find where your company file is currently stored #
By default, QuickBooks saves your company files to the following location:
C:\Users\Public\Documents\Intuit\QuickBooks\Company Files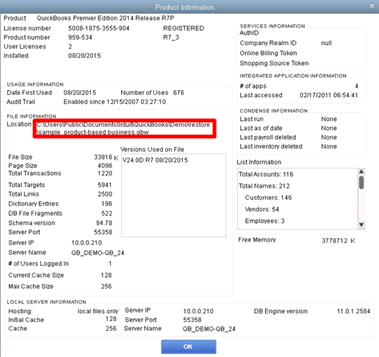
Sometimes however, people have their company files stored on their desktop or their documents folder. MyQuickCloud doesn’t allow your users access to your documents or desktop folders so in order for them to use the company file we first need to find it and if applicable, move it to a public location.
To find the current location of your company file, open QuickBooks, log in to your company file and press F2 on your keyboard. This will show you the product information window with the file location (see screenshot).
If your file is already in the public folder, or in another publicly accessible location (such as a shared drive connected to your host) then you can move to step 2.
Step 2 – Save your company file as a back up #
To move your file, we first need to save it as a backup. Log in to your company file and follow the steps below:
- Go to the File menu, and select Save Copy or Backup… This will open the backup wizard.
- Select Backup copy in the Save Copy or Backup window. Click Next.
- If prompted, save your company file backup to your desktop and give it a name like ‘QB Backup dated yyyy-mm-dd”.
- Click Next, click Save it now, and then click Next.
- Click Save to use this location and start the backup.
- When the backup is complete, QuickBooks displays a message showing the location of the backup file. Click OK.
Step 3 – Restore your company file in the public folder #
Now, you can restore your company file to the correct location by following these steps:
- Select the QuickBooks File menu and select Open or Restore Company.
- Select Restore a Backup Copy and click Next.
- Click the Look In drop-down arrow, select the location of the backup file, and then select the file name of the backup file (it should have a .qbb file extension).
- Click Open. The Restore Backup to Location window opens.
- Click Next. The Restore To window opens.
- Click the Save-in drop-down arrow and select the location to restore the file to which is C:\Users\Public\Intuit\Quickbooks\Company Files or another public location of your choosing.
- Enter a new file name in the Filename field, giving it a .qbw extension.
- Click Save and then carefully read any message that appears before you restore the file.
If you are using additional files such as logos you will need to manually copy those files from the old folder location to the new one.
Step 4 – Ensure everyone is working from the same file #
You must now ensure that everyone is setup to use the same file. As you have moved the file (so that you can access it remotely through MyQuickCloud) you will need to make sure that any local users at the physical machine are set to use the file in the new location and do not continue to use the old file.
It is advised that you remove the old location from the company file list (when you first open QuickBooks, before logging in to your company file) by clicking “edit list” under the Open button and selecting the old location and removing.
The video below shows you these steps in more detail and remember you can always check the location of the file that you are working on by pressing the F2 key.
Watch the steps in a video #
Turn your sound on to hear the instructions, or turn on the captions using the toolbar at the bottom of the video