Working With Networked Drives #
When connecting to your computer you may wish to access networked drives in MyQuickCloud that are available on the network that the remote computer is attached to. As MyQuickCloud creates a new user on the host computer for remote access you will likely not have those network drives mapped and available by default.
There are a few different ways you can achieve access to these network drives in MyQuickCloud as explained below.
Please Note: Depending on how the network is set-up you may need your IT support to give you the correct permissions and network paths.
Map a network drive
Mapping a network drive is the easiest way to ensure you have access to the network locations each time you log in remotely. To map a drive:
Windows 8 / 10
- Click “Start” and in the search box type “This PC” to display the screen below

- Click the “Computer” tab at the top
- Click “Map Network Drive”

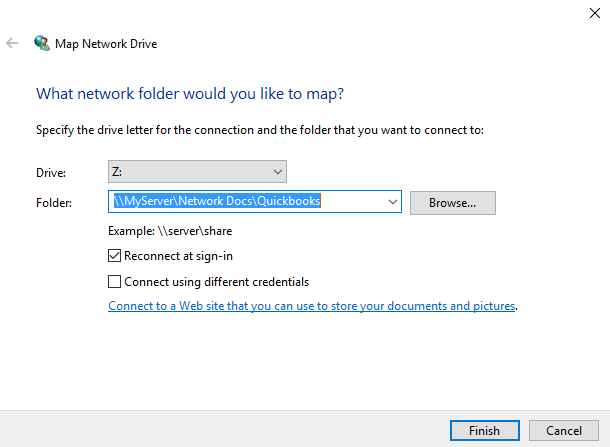
- Choose a free drive letter from the drop-down
- Enter the path to the network folder (You may need your IT support to provide the correct path for you)
- Ensure “Reconnect at sign-in” is ticked
- Click “Finish”
Please Note: You may be prompted for a username and password to connect to the mapped drive depending on the network setup (This will be your network details), Once again speak to your IT support to get the correct details.
Windows 7
- Click “Start” > “Computer” to display the screen below

- Click “Map network drive”

- Choose a free drive letter from the drop-down
- Enter the path to the network folder (You may need your IT support to provide the correct path for you)
- Ensure “Reconnect at sign-in” is ticked
- Click “Finish”
Please Note: You may be prompted for a username and password to connect to the mapped drive depending on the network setup (This will be your network details), Once again speak to your IT support to get the correct details.
One off access
If you only need to access a network location temporarily you can simply click Start > Run in Windows and type in the network path e.g \\MyServer\Files
Again you may be prompted to provide a network username and password to gain access.


